


Recent Recipes
L.A. Burgers and Fries
Comments (1) | Friday, July 23, 2010

.JPG)
Read More......
Watermelon Slush
Comments (0) | Thursday, July 22, 2010
Okay I give in... I've really been wanting to post this recipe for Watermelon Slush so I'm doing it. You will just have to take my word that not everything I make is frozen and sugary. I had tons of leftover watermelon in the fridge after our visitors left and I didn't know what to do with it all, so I found this recipe and now the watermelon's almost gone.

Unfortunately I don't remember where I found the original recipe, but I've changed it a little bit anyway since I thought it was a little bit too sweet and needed to be more frozen. I would definitely recommend making a couple batches of this to keep in the freezer since it doesn't take up that much space and is REALLY good.
Watermelon Slush
Ingredients
5 cups frozen watermelon cubes
1/4 cup honey
Juice from 1 lemon
(To make it alcoholic you could probably add some type of liquor)
Read More......
New Facebook Page
Comments (0) |

Read More......
Snap Pea, Asparagus, and Mushroom Stir-Fry
Comments (0) | Wednesday, July 21, 2010
While I was really tempted to post a recipe for strawberry margaritas or this really good watermelon slush I made recently, I resisted because I realized that almost every recipe I've posted so far has been sweet and frozen.
Instead, I want to share the snap pea, asparagus, and mushroom stir-fry I made tonight as a side for some flank steak. I've made this stir-fry tons of times, and I think I've finally gotten it perfected.

The original recipe is from Martha Stewart, and although Martha is a saint I like the stir-fry with some mushrooms added, less spiciness, and more garlic.
Snap-Pea, Asparagus, and Mushroom Stir-Fry
Adapted from Everyday Food
Serves 4.
Ingredients
8 ounces sugar snap peas, stem ends removed (and, if necessary, strings)
1 bunch asparagus, tough ends removed, cut into 2-inch lengths
3 cups white mushrooms, stems removed and quartered
6 garlic cloves, thinly sliced
1/8 teaspoon red-pepper flakes
2 tablespoons soy sauce
2 tablespoons rice vinegar
Directions
Place snap peas, asparagus, mushrooms, garlic, red-pepper flakes, and 1/4 cup water in skillet.
Cook, tossing, until vegetables are crisp-tender, 3 to 5 minutes.
Add soy sauce and vinegar; toss to combine
.JPG)
Read More......
Ice Cream in a Jar Gift
Comments (0) |
Like I mentioned before, the bf and I have been doing a lot of traveling this summer, at least around the west coast. A couple weeks ago we visited his sister and her husband in CA, and beforehand I decided that I wanted to make a thank you gift to give to them at the end of our trip.

Carefully fold up and tape the gallon-sized Ziploc bag into a small square so that it sits neatly on top of the rock salt, forming a new layer.
Fill the pint-sized Ziploc bag with the sugar. Carefully fold and tape the bag into a small square so that it forms an additional layer in the jar.
Add the creamer packets on top, forming the last layer.
Print and cut out labels to attach to the jar. Click here for the labels Personalize a blank tag with a message to whoever you're giving the gift to. Use ribbon or whatever embellishments you want to make the jar pretty!
Write or type out these directions on another blank tag:
Directions
- Remove creamer and both plastic bags from jar, set aside. Carefully remove tape and unfold each plastic bag.
- Pour salt from jar into the gallon-sized plastic bag. Fill bag 1/2 with ice and mix with salt. Set aside.
- Combine creamer packets with sugar in the other plastic bag. Add 1/2 cup milk. Seal tightly closed.
- Place small bag in large bag, and seal the large bag tightly closed. Shake for 5-8 minutes.
- Enjoy your ice cream!

Read More......
Dill Pickles
Comments (0) |
Pickles have been a summer staple in our apartment. No matter what, we always have a jar of dill pickles in the fridge.
.JPG)
About half way through the summer I got the crazy idea of trying to make pickles myself. My bf is somewhat of a pickle connoisseur. He only eats one brand of pickles that you buy at the store, and he eats them often.
I figured, what the heck? It was worth a try. My bf is used to me experimenting with cooking different things, sometimes to not the greatest outcome.
I used a recipe I found online at EatingWell.com, but halved the recipe. We definitely didn't need 6 jars of pickles in the house, although they probably would've got eaten.
The recipe is excellent with just a little bit of tweaking, and it's easy enough that I try to make a jar every couple of weeks. They would be especially handy to take to a summer BBQ.
The only thing is that I can never find pickling cucumbers (kirby cucumbers) at the grocery store, and I don't really feel like tracking them down. I have always used regular cucumbers and trimmed a few inches off of them depending on the jar I'm using. Then, you can eat the left-over cucumber while you're making pickles =) Also, once I used cider vinegar, because the original recipe says you can, and I was out of white vinegar. Big mistake! It was WAY too tangy.
I love lots of dill and lots of garlic so feel free to use more or less, depending on what you like.

Dill Pickles
Adapted from EatingWell.com
Ingredients
3 cucumbers (depending on jar), cut into quarters
1/2 tsp pickling spice
12 sprigs fresh dill
1 tsp dill seed
5 whole cloves garlic, sliced
1 1/2 cups distilled white vinegar
1 1/2 cups water
1 tbsp plus 1 tsp sea salt
1 tbsp sugar
Preparation
1. Place cucumber spears into a canning jar or other tempered-glass container with a lid (You can also wash and reuse a store-bought pickle jar). Add pickling spice to the jar. Divide the dill springs, seeds, and garlic slices among the cucumbers.
2. Combine vinegar, water, salt and sugar in a large saucepan. Bring to a boil and stir until the salt and sugar dissolve. Let boil for 2 minutes. Remove from the heat.
3. Carefully fill jar with brine to within 1/2 inch of the rim, covering the cucumbers completely. (Discard any leftover brine)
4. Place lid on jar. Refrigerate for at least 24 hours before serving. Store in the refrigerator for up to 1 month.
Read More......
Frozen Hot Chocolate and House Guests
Comments (0) | Tuesday, July 20, 2010
"Hospitality is making your guests feel at home, even if you wish they were."
Don't be deceived by the quote above... I have loved having so many house guests this summer. Every weekend it feels like we are preparing for someone to come visit us in AZ, or to go on a trip somewhere else and it's great.
Even though it can get a bit stressful with the obsessive cleaning required and other things, I love being busy and ESPECIALLY love being able to cook for new people.
This past week my bf's parents came to visit from MO. We also had some celebrities in our home; my bf's sister and brother-in-law came to visit from CA, and they were on the Marriage Ref this season!
Click here to check them out on the NBC website.
We ended up having a really good time hanging around town, visiting Sedona for a day to swim and sight-see, and getting burnt to a crisp while tubing on the Salt River.

The icing on the cake, so to speak, was that they all liked (or at least claimed to like) everything I cooked for them.
I'm not going to share all of my nearest and dearest recipes right away, but these are the menus I prepared.
Overboard? Maybe.
#1
Roasted lemon chicken
Garlic mashed potatoes
Peas
Cheddar scallion mini cupcakes
#2
Quattro formaggi agnolotti w/ homemade alfredo sauce
Green bean, tomato, mozzarella salad
French baguette w/ homemade dipping oil
Random
Buffalo chicken dip (my bf's fav)
Strawberry italian ice
Strawberry popsicles
Frozen hot chocolate
Oatmeal chocolate chip cookies
Butterfinger cookies
Strawberries dipped in chocolate and filled with sweet whipped cream
What I will share is the amazing (and simple) recipe for Frozen Hot Chocolate which I found in the latest issue of Woman's Day magazine and adapted slightly.
I had experienced Frozen Hot Chocolate from Serendipity for the first time while in Vegas for my 21st birthday and absolutely loved it, so I was thrilled to find a recipe that tastes almost as good- I don't think anything beats Serendipity!
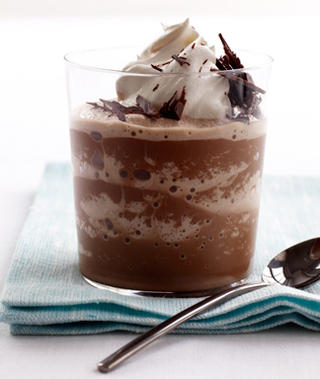
Frozen Hot Chocolate
Adapted from Woman's Day Magazine
Ingredients
1⁄2 cup chocolate syrup
1 cup fat-free evaporated milk
1⁄2 teaspoon vanilla extract
1 teaspoon sugar
3 cups ice cubes
Preparation
1. Combine chocolate syrup, evaporated milk, vanilla, sugar and ice in a blender until smooth.
2. Pour into glasses. Garnish with a dollop of whipped topping and/or a sprinkling of chocolate shavings if desired
Read More......


